
In this article you will find an explanation of the Dashboard section in your Control Panel. Learn what you see and what you can do in this very important section of your website.
When you log into your parkbench account, the first thing that you will see is the home page. To go to your Control Panel, click on your profile icon in the top right corner of the website. This will open a drop down menu. Then click “Control Panel”.
The Control Panel has many sections; they are located at the left. But now we are going to focus only on the Dashboard.
The complete dashboard looks like this:
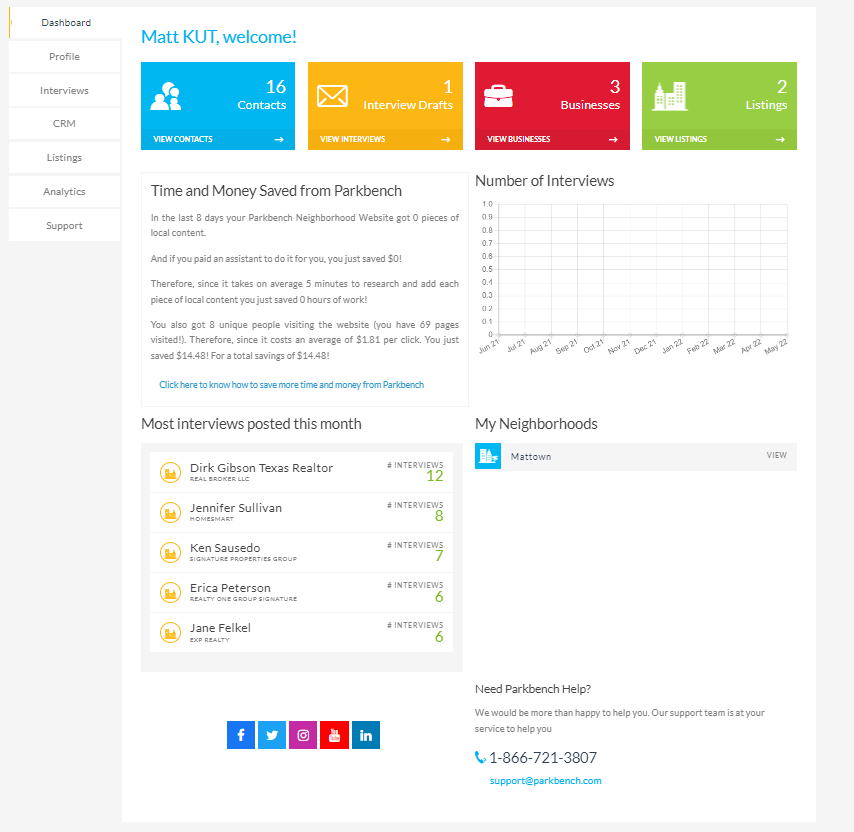
The dashboard is composed of 6 sections. Here we will explain what information and what you can do in every one of them.
1. At the top of the page, you will see 4 colored boxes.

The first one (blue), shows you how many contacts you have; they are residents in the community that have created an account on your website and also business form the Directory. If you click on it, it will send you to the CRM section, where you will see all their data. Keep in mind that you will see a larger number of contacts in the CRM as also the businesses are gathered there, the same business that you can see in the third box (red).
In the yellow box, you can see how many interview drafts you have. These are interviews that you have started but haven’t posted. If you click on this box, it will send you to the interview template screen where you can finish the draft or create a new interview.
The green square lets you know how many listings you have added to your website. If you click on it, it will send you to the Listings tab in the Control Panel.
2. The second section is where you will find a brief description and explanation of how much money you are saving by using Parkbench. The numbers will vary depending on the amount of content that you are posting on your website and how many people are interacting with your site. The more you nurture your website, the more you will save.

3. This chart shows the number of interviews that you do every month. This is useful as you will see how active you were during the year and will help you stay consistent throughout your sponsorship.

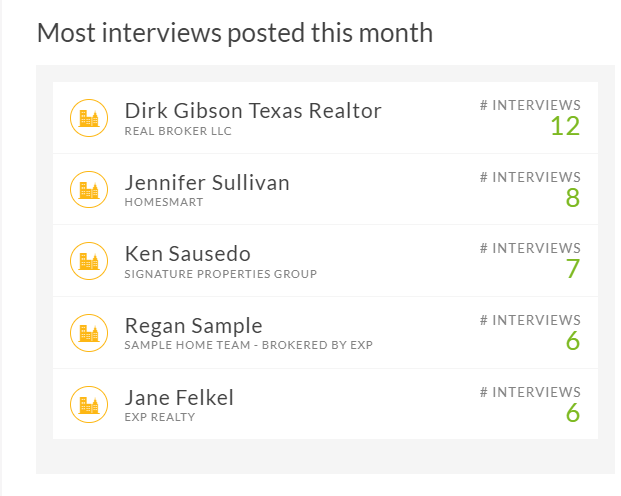
4. The next section shows the Local Leaders with the most interviews per month. If you click on their names you will be sent to their site and you can see what they are doing. Check out their sites for motivation or inspiration for new interview ideas!
5. In “My Neighborhoods” section you will find all the websites that you currently sponsor. Click on the area name to go to the respective Parkbench site.

6. The last section contains contact information for Parkbench. On the right hand you will see all our social media sites. On the left you have the contact information for our Support team. Reach out to us if you have any questions!
